Creating Top-Level Facilities
Note: Many of the facility settings appear on both top-level and sub-level facilities. The functions for these settings are the same for both top and sub-level facilities but apply directly to the facility to which they're assigned.
The top-level facility is the main facility, building, park, or campground, underneath which you'll create sub-level facilities.
Let's use the example of a park.

General
In your Facility List click [+ Add Top Level Facility/Park]
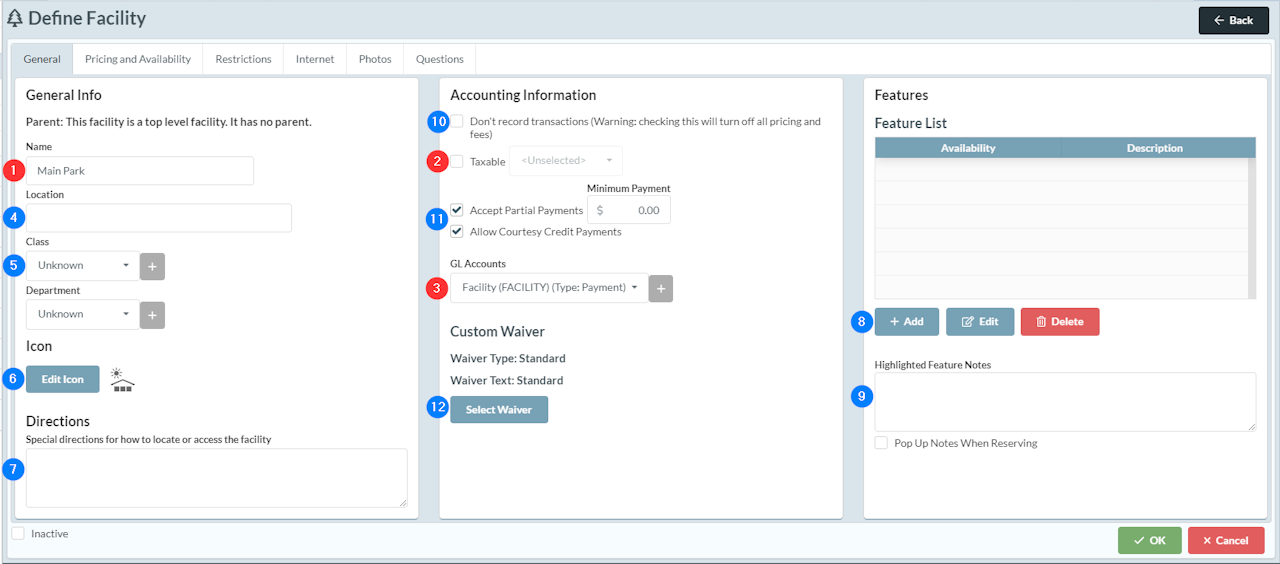
The first thing you need to do is give your facility a name (1). For this example, we'll name the top-level facility "Main Park".
If the facility can be reserved, enter the tax rate if applicable (2). Otherwise, uncheck the "Taxable" checkbox.
In most cases, you won't let people reserve an entire top-level facility, but you will still need to assign a GL Account to the facility to add it to your facility tree (3).
The rest of the fields under general settings are optional but can be a great tool to provide information to your community.
The "Location" is for the address or coordinates of the facility (4).
The "Class" and "Department" picklists are filter options you can use when making a facility reservation (5).
Consider updating the icon using the [Edit Icon] button (6) and choosing an icon relevant to the facility you're creating, entering special directions (7), and updating the feature list to include features that may come with a reservation for this facility (8).
The "Highlighted Feature Notes" field can be used to provide any additional information to your community that you don't plan to put in your feature list (9).
If you need to make reservations for a facility but don't need to record transactions for those reservations, there's a checkbox to prevent the recording of transactions (10).
The Partial Payments option allows you to add a portion or the entire balance for a transaction to an account rather than taking payment at checkout (11).
Finally, you can choose to use the "Standard Waiver" from your site settings or enter a custom waiver specific to this facility (12).
Pricing and Availability
The first setting in this section that you will need to set is your "Reservation Type."
There are separate guides for each reservation type linked to this step that give more details on each option.
If your top-level facility is non-reservable, you usually use "Freeform" as your reservation type. Freeform reservations offer the most flexibility for time and pricing but cannot be used for online reservations. When used for a top-level facility, you can still display the facility online, but cannot allow reservations for the top-level facility. Sub-level facilities will have a separate reservation type and can be reserved online if the facility uses a reservation type that allows it.
"Predefined Time Slots" are used to set specific availability windows for facility reservations.
"Resource" Will only be used when the specific facility being reserved doesn't matter and you only care about the time of the reservation.
"Campground" is the top-level facility for creating campsites.
If the top-level facility is non-reservable no additional configuration is needed for this section.
Refer to the reservation type guide relevant to your facility if you allow reservations for your top-level facility.
